Top 10 Tips for Car Electronics Installation You Need to Know
When it comes to enhancing your vehicle's functionality and entertainment through car electronics installation, understanding the process is crucial for achieving satisfactory results. Whether you are upgrading your audio system, adding GPS navigation, or installing dash cams, the right installation techniques can make all the difference. With a multitude of components and technologies available today, car electronics installation can seem daunting, especially for beginners. However, with the right guidance and a few essential tips, even novice car owners can successfully navigate this exciting journey.
In this article, we will explore the top 10 tips that every car enthusiast should know before diving into car electronics installation. These tips will not only help streamline the process but also ensure that the installations are done safely and effectively. From selecting the right tools and equipment to understanding wiring basics, this guide aims to empower you with the knowledge needed to transform your vehicle into a more connected and enjoyable space. Whether you plan to tackle the installation yourself or seek professional help, being informed will lead to better decisions and, ultimately, a more satisfying outcome. Let’s get started!

Understanding Car Electronics: Key Components and Functions
Understanding car electronics is essential for anyone looking to enhance their vehicle’s functionality and performance. Key components in car electronics include the head unit, amplifiers, speakers, and wiring. The head unit functions as the control center for your audio and video systems, allowing you to manage playback, navigation, and connectivity options. Amplifiers boost the power of audio signals, ensuring a clear and powerful sound. Speakers, on the other hand, are responsible for reproducing sound, and their quality can significantly impact your listening experience. Lastly, proper wiring is crucial for a reliable installation, connecting all components seamlessly.
When installing car electronics, it’s important to remember a few key tips. First, always disconnect the car battery before starting any installation to prevent electrical shorts. Secondly, read the instructions carefully for each component to ensure compatibility and proper setup. Taking time to lay out your wiring can also help avoid tangles and make troubleshooting easier down the line.
Another useful tip is to invest in sound dampening materials if upgrading your audio system. This will minimize unwanted vibrations and road noise, allowing for a purer audio experience. Lastly, consider seeking help from a professional installer if you’re uncertain about any aspect of the installation process, as this can save time and ensure everything is set up correctly for optimal performance.
Top 10 Tips for Car Electronics Installation You Need to Know
| Tip No. |
Tip Description |
Key Components |
Functionality |
| 1 |
Read the manual before starting installation |
User Manual |
Understanding wiring and connections |
| 2 |
Choose the right tools |
Screwdrivers, Wire Strippers |
Ensuring a proper fit and secure installation |
| 3 |
Disconnect the battery |
Car Battery |
Preventing electrical shock or damage |
| 4 |
Review vehicle's existing wiring |
Wiring Harness |
Identifying correct connections |
| 5 |
Invest in quality connectors |
Connectors and Adapters |
Ensures reliability and prevents corrosion |
| 6 |
Utilize heat shrink tubing |
Heat Shrink Tubing |
Protects connections from moisture |
| 7 |
Test all connections before final installation |
Multimeter |
Ensures everything works correctly |
| 8 |
Manage and organize wires |
Wire Management Tools |
Prevents tangles and facilitates troubleshooting |
| 9 |
Securely mount all components |
Mounting Hardware |
Prevents movement during driving |
| 10 |
Final check and battery reconnection |
Car Battery |
Ensure that everything is working properly |
Essential Tools for Successful Car Electronics Installation
When it comes to successfully installing car electronics, having the right tools can make all the difference. According to industry reports, nearly 60% of car electronics installation failures are attributed to improper tools or inadequate setups. Investing in a quality toolkit is essential for achieving a professional finish and ensuring the longevity of your installations.
Key components of a good toolkit include wire strippers, crimping tools, and a multimeter, which allows for accurate electrical diagnostics. A high-quality soldering iron can also be invaluable for making secure connections, which is critical for preventing issues down the line.
In addition to basic tools, specific installation accessories are crucial for a streamlined process. For instance, zip ties and adhesive mounts provide a clean and organized look by managing cables effectively. According to recent market analysis, the demand for these accessories has surged by over 30% as DIY enthusiasts and professionals alike recognize their importance in installation projects.
Furthermore, a portable power supply is vital for testing systems before finalizing the installation, ensuring that everything functions correctly without relying solely on the vehicle’s battery. These tools and accessories not only facilitate a smoother installation process but also enhance the overall performance and reliability of automotive electronic systems.
Step-by-Step Guide to Removing Factory Components Safely
When embarking on the installation of car electronics, safely removing factory components is a critical first step. According to a recent industry report, over 60% of car electronics issues stem from improper installations. Ensuring that you remove factory components without damaging them not only preserves the integrity of your vehicle but also enhances the effectiveness of your new installations. A systematic approach is essential; it typically starts with disconnecting the car battery to prevent any electrical shorts or shocks.
Next, familiarize yourself with the layout of your vehicle by consulting repair manuals or online resources specific to your make and model. Proper tools, such as trim removal tools, can help avoid scratches and snags on interior panels. Interestingly, a survey indicated that using the wrong tools leads to a 30% increase in the risk of damaging delicate factory wiring. As you proceed, take care to label and safely store screws and components to facilitate straightforward reassembly. Following these steps can greatly enhance both your DIY experience and the performance of your new car electronics.
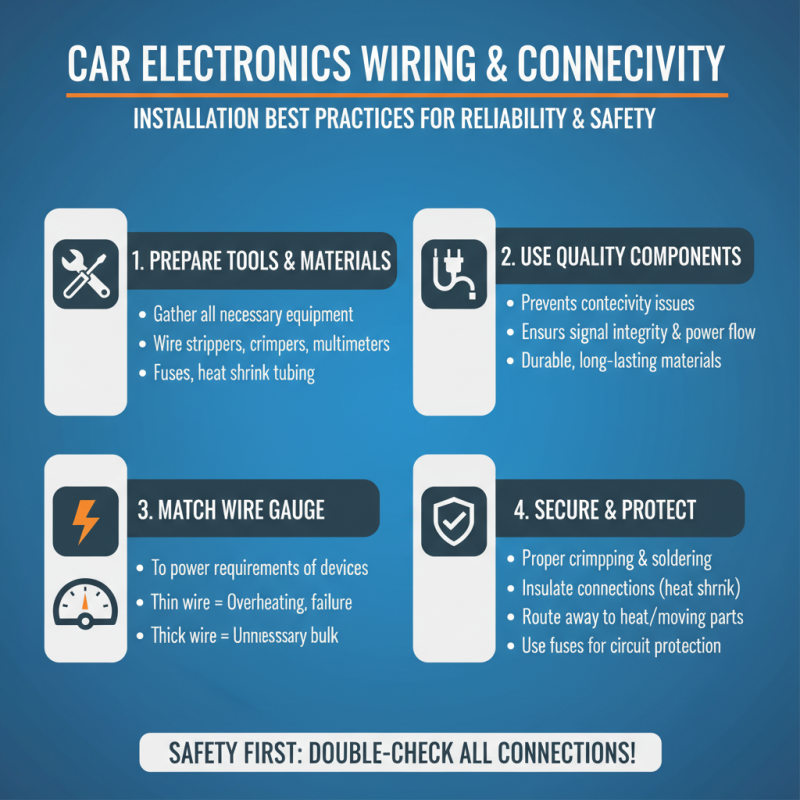
Tips for Wiring and Connectivity During Installation
When it comes to car electronics installation, proper wiring and connectivity are crucial for ensuring the system functions effectively and safely. Start by gathering all necessary tools and materials before beginning the installation. This preparation will help streamline the process. Always use quality wires and connectors to prevent any potential issues with connectivity. It’s essential to match the gauge of the wires to the power requirements of the devices being installed. Using too thin of a wire can lead to overheating and potential failure, while using excessively thick wires may complicate the installation unnecessarily.
As you connect wires, be meticulous about labeling them. This practice not only simplifies the installation but also aids in troubleshooting later on if problems arise. Make sure to avoid any pinched or frayed wires, as these can cause shorts or erratic behavior in your electronics. Additionally, when making connections, consider soldering as a more reliable option over crimping for certain applications, especially in areas exposed to vibrations or movements. Finally, ensure all connections are properly insulated to prevent moisture and debris from causing corrosion or short circuits. Taking these steps will significantly enhance the reliability and longevity of your car’s electronic systems.
Testing and Tuning Your Installed Car Electronics for Optimum Performance
When it comes to optimizing the performance of installed car electronics, testing and tuning are crucial steps that every car enthusiast should prioritize. According to a report by the Consumer Electronics Association, the automotive electronics market is expected to reach $350 billion by 2025, underscoring the growing importance of quality installations and the need for precise calibration. The process of testing ensures that each component, from sound systems to navigation aids, operates effectively in isolation and as part of a cohesive system. Techniques such as using an oscilloscope to measure voltage levels and performing sound frequency tests can help ascertain whether the system is delivering optimal performance.
Tuning goes a step further by adjusting settings based on real-world testing conditions. This can include fine-tuning audio systems for noise cancellation or recalibrating GPS systems for accuracy based on local topography. In a survey published by A/V Industry Insights, nearly 70% of users reported a noticeable improvement in their system's performance after proper tuning. Utilizing software tools and professional calibration rigs can provide invaluable data that aid in setting up time alignment and equalization. Thus, prioritizing these aspects not only enhances the user experience but can also prolong the lifespan of the electronics, making thoughtful testing and tuning processes indispensable in any car electronics installation.