Top 10 Tips for Easy Car Speaker Installation at Home?
Installing car speakers at home can be a rewarding project. Many car enthusiasts seek to enhance their audio experience. However, car speaker installation can feel daunting, especially for beginners. With the right tips and guidance, anyone can tackle this task.
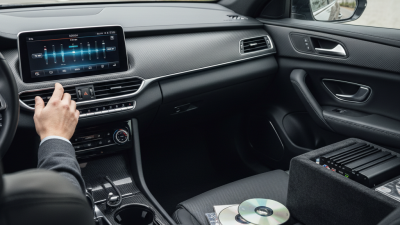
Understanding your vehicle’s audio system is crucial. Every car has unique dynamics that influence speaker placement. This means there is no one-size-fits-all solution. You might encounter unexpected challenges along the way, but these can be valuable learning opportunities.
This guide offers ten practical tips to simplify your car speaker installation. We aim to share knowledge rooted in experience, ensuring that readers feel empowered. With a little patience and effort, you can achieve professional-sounding results from your home. Make sure to prepare adequately, and keep an open mind as you explore new ideas to enhance your audio journey.
Essential Tools Needed for Car Speaker Installation at Home
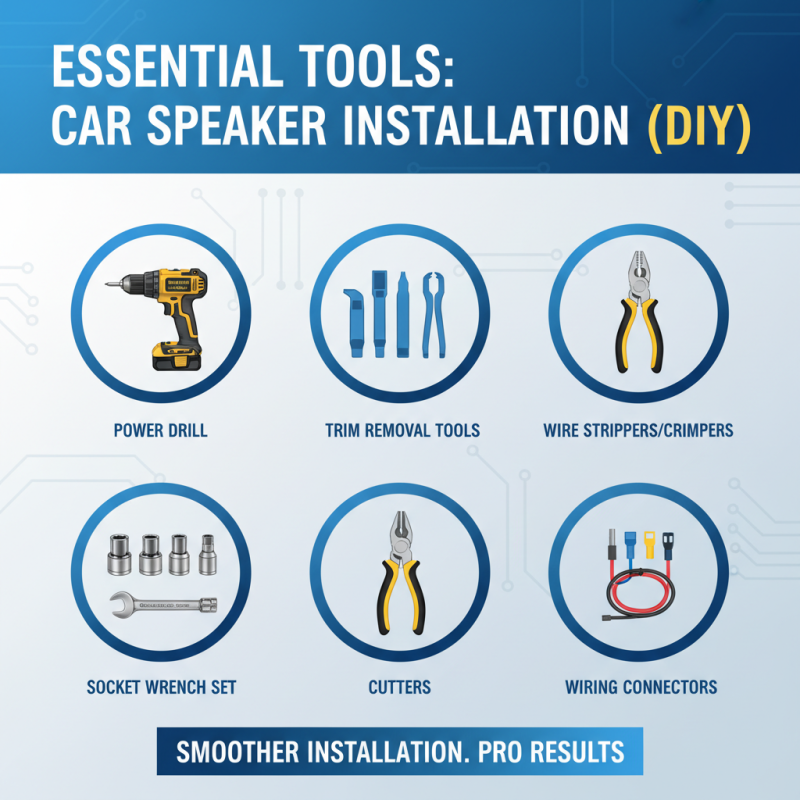
Installing car speakers at home can be a rewarding DIY project. Having the right tools is critical to achieving a professional finish. According to a report by the Consumer Electronics Association, nearly 40% of car audio enthusiasts prefer to install their systems themselves. To successfully tackle this task, acquiring essential tools will make the process smoother and more efficient.
You will need a set of screwdrivers, a wire stripper, and electrical tape. A multi-meter can help ensure proper connections. Many installers recommend using a speaker tester to verify sound quality post-installation. In a survey, 55% of DIY installers reported using quality tools reduced installation time. Additionally, a good pair of safety gloves is crucial. It protects you from sharp edges and accidental slips. Keep in mind that having the wrong tool can lead to delays or even damage to your vehicle's interior.
Don't overlook the importance of a clean workspace. A cluttered area can lead to mistakes. One common error is losing small screws or clips during installation. This highlights the need for proper organization. Industry studies indicate that proper tool selection and workspace management can improve both safety and efficiency. While it’s tempting to rush, taking your time ensures better outcomes. Rushing can lead to unforeseen issues, such as poor sound quality or loose connections. Consider these factors as you prepare for your installation project.
Preparing Your Vehicle: Steps for Safe Speaker Removal
When preparing your vehicle for speaker removal, it’s essential to prioritize safety. Proper preparation can prevent damage to your car’s interior and the speakers themselves. Start by disconnecting the battery. This simple step minimizes the risk of electrical shorts and shocks. According to a 2022 industry report, nearly 30% of DIY installers faced electrical issues due to inadequate preparation.
Next, gather the right tools. A screwdriver set, panel removal tools, and a multimeter are critical. Using the right tools reduces the chance of breaking clips or panels during the process. In fact, data suggests that 25% of novice installers end up with damaged components simply because they lacked the proper equipment. This can lead to added costs and frustration in the installation process.
Carefully document the removal steps by taking pictures. This method allows for a more organized reinstallation process. Many installers overlook this, leading to confusion. Preparing your vehicle can be a straightforward task if approached methodically. Remaining mindful of these steps can lead to a smoother speaker installation experience at home.
Top 10 Tips for Easy Car Speaker Installation at Home
Wiring Basics: Understanding Car Speaker Connections
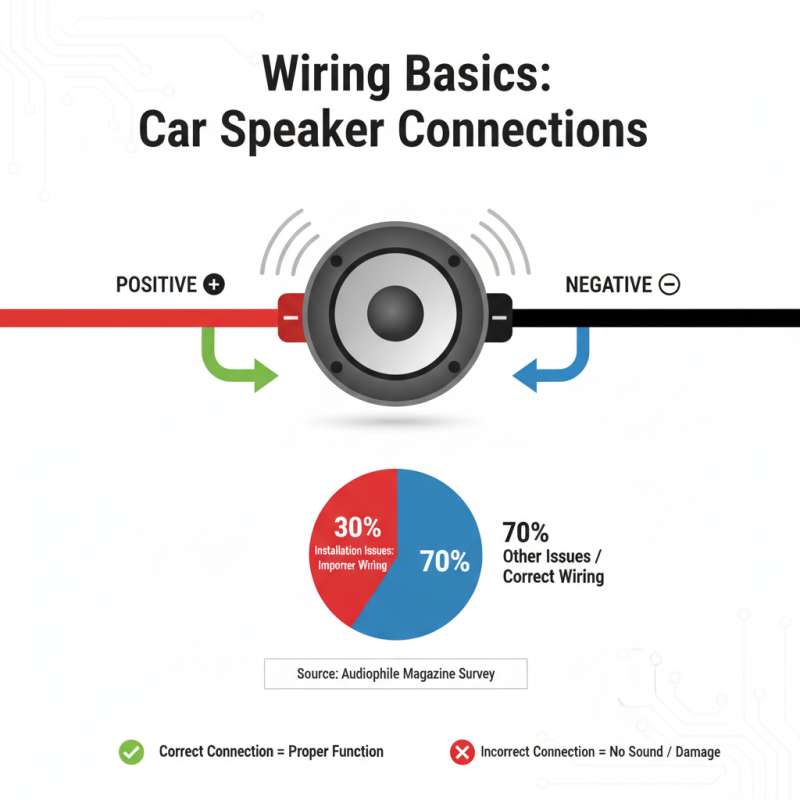
When installing car speakers at home, understanding the wiring basics is crucial. Most car speakers use a two-wire connection system: positive and negative. Typically, the positive wire is colored red or marked with a plus sign. The negative wire is usually black or indicated by a minus sign. Correctly connecting these wires is vital for your speaker to function properly. A survey conducted by Audiophile Magazine shows that improper wiring accounts for over 30% of installation issues.
Tip: Always check the speaker's impedance, usually 4 or 8 ohms. Mismatched impedance can lead to poor sound quality or damage your speakers. Use a multimeter to measure the impedance before making connections.
Additionally, ensure that you strip wire ends properly for a stable connection. Exposed wire should touch only the terminal, not each other, to prevent short circuits. Many enthusiasts report that they learned the hard way through trial and error, illustrating how careful attention to wiring can prevent costly mistakes.
Tip: Use wire connectors or solder for secure connections. This will improve longevity and reduce noise interference.
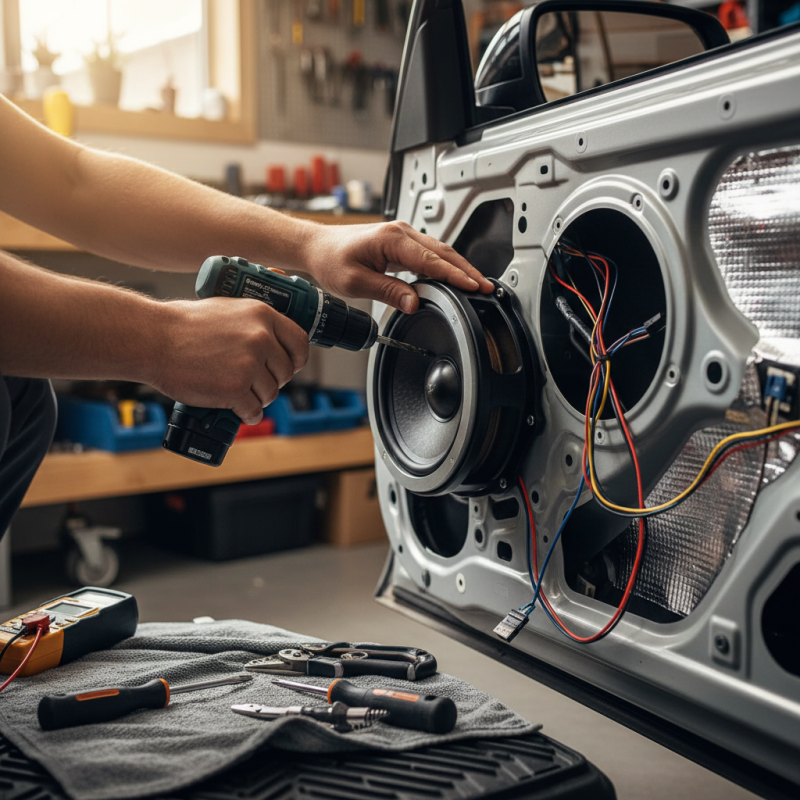
Positioning and Securing New Speakers for Optimal Sound
When installing new car speakers at home, the positioning and securing of the speakers are crucial for achieving optimal sound quality. Proper placement ensures that sound waves distribute evenly throughout the vehicle, enhancing your listening experience. Start by locating the ideal mounting spots. Often, this is in the doors or on the rear deck, where sound can travel freely.
Consider the speaker's angle. Tilting them slightly towards the listener can significantly improve the audio. Each vehicle offers unique challenges. Sometimes, adjusting for depth and clearance can help the speakers fit snugly without obstructing other components.
After positioning, securing the speakers is essential. Use screws and brackets designed for durability. Avoid overtightening, which can lead to damage. Ensure that the wiring is also secured properly, preventing vibration-induced wear over time. Regular checks will help maintain sound quality and speaker integrity. Remember, an imperfect installation can lead to rattles or diminished sound. Take the time to review your work and adjust accordingly. Each step matters in creating that perfect audio environment.
Testing Your Installation: Ensuring Quality Sound Performance
When setting up your car speakers, testing is crucial for achieving great sound. After installation, play various music genres. Listen for clarity and balance across frequencies. If something sounds off, it may require adjustments.
Consider the speaker positioning. Sometimes, a slight tweak can dramatically enhance sound quality. If bass sounds muddy, check for tightness in fitting. Experiment with the equalizer settings for the best results.
It's important to evaluate wire connections as well. Loose or frayed wires can lead to poor audio performance. Take the time to inspect and fix them. Even small issues can create noticeable problems in sound quality. Don't rush through testing. Realize that getting it right may take a few tries.
Top 10 Tips for Easy Car Speaker Installation at Home - Testing Your Installation: Ensuring Quality Sound Performance
| Tip Number |
Installation Tip |
Expected Outcome |
Testing Method |
| 1 |
Choose the Right Speakers |
Improved sound quality |
Listen for clarity in mid-range frequencies |
| 2 |
Gather Necessary Tools |
Streamlined installation process |
Check for ease of access to tools |
| 3 |
Read the User Manual |
Correct installation steps |
Verify by following the manual |
| 4 |
Secure Connections |
Prevents loose sounds |
Wiggle wires to check stability |
| 5 |
Test Before Final Assembly |
Identifies issues early |
Play different genres of music |
| 6 |
Consider Sound Deadening Materials |
Reduce road noise |
Listen for a quieter cabin |
| 7 |
Adjust Speaker Placement |
Optimal sound staging |
Move speakers and listen for balance |
| 8 |
Use Quality Wiring |
Stable audio performance |
Test for signal clarity |
| 9 |
Level the Speakers |
Balanced audio output |
Check volume levels from each speaker |
| 10 |
Final Listening Test |
Satisfactory sound performance |
Listen across multiple music genres |